Sunday, September 8, 2013

Monday Made It: Back to School Freebies!

I'd love to link up with something fun like a banner or wreath with my initials but sadly, school's back in session so my Monday Made It posts just aren't quite as exciting as they were this summer when I had a lot more free time on my hands. But I still wanted to link up with Tara from Fourth Grade Frolics for her monthly Monday Made It to show off things I've been up too....


I was inspired by Jivey (check out her blog post here) last week and her post about using TAG when doing peer revision/editing. I used something very similar in my room last year but TAG is such an easy acronym for students to remember I decided to try it out this year. So, I downloaded the free handout from MsJordanReads TPT store and started planning out my lessons for peer revising reading response letters for next week. However, I soon realized some of my students this year are going to need some help with "TAGGING" their partners. Solution: I created a quick and easy handout of sentence starters to help them until they get the hang of it. I got the idea for some of the starters from Panicked Teacher's Student Feedback Wheels. I just combined both great ideas (TAG + WHEELS) into one helpful document for my students! If you want a free copy from my drop box, you can snag it here or by clicking the picture. I figured I could turn them into half sheets and have them glue them into their notebooks for reference.


My next Made It comes courtesy of my ATP Chelsea! My awesome partner looked up all the words in our next Social Studies unit because she ROCKS! I printed out and laminated the words so that we can create a word wall for our Native American unit that we will be starting on Monday in Social Studies. We start a lot of units off with a Word Wall so that we can become familiar with the vocabulary before we even start the chapter. These words come from the History Alive! textbook series but could be used with  many different studies of Native Americans. If you would like a free set of Native Americans words you can download them from Dropbox here.


Lastly, Reader's and Writer's Workshops are in full swing. I've been making charts like crazy! It's time consuming! I did laminate a few charts last year that I knew I would use again that has really saved some time this year! Just make them on the SMARTboard and tell the students you'll compile the charts overnight... poof! Done for next year! I also created my own Notebook cover because I think it's important that students see me as a reader and writer as well.

Can't wait to see all things everyone else has made!
Share:

Monday, July 29, 2013

Last Made It's and Must Haves of July!

I'm definitely a creature of habit. So in typical Monday fashion,  I decided to link up with Tara from Fourth Grade Frolics and Sabra from Teaching with a Touch of Twang for their fantastic Monday linky parties!

Now, I'll admit, I wasn't as productive as I would like to be. Last night I was at the Blake Shelton concert until very, very late and so today, I just didn't have the hustle. Plus, I was working a guest blog post that I'll be sharing with you next week!  So here are the my Must Have's and Made It's for the week!

My laminator! I know, I know I just purchased it last week... but it's already helped me with so many projects before school has even started! I couldn't live without this little guy. This week's Made It's were all thanks to my handy dandy laminator and Teachers Pay Teachers! I couldn't have "made it" without them both! 

New genre posters from Teachers Pay Teachers. You can find them in Elise Stoddard's store or by clicking here. At first, I wasn't going to purchase them because I just created a new genre wall last year but I wasn't really "in love" with it. These posters are super bright and colorful but they also include example texts with lexiles of 700 or above! Perfect for older readers! Many of the genre posters I've found previous are more primary than intermediate. These posters are perfect... Adventure Fiction for example includes Hatchet, The Hunger Games, and Island of the Blue Dolphins! I made these my own by backing them with neon cardstock from Target and then laminating them! 

New labels for my nonfiction book bins! I bought so many new books this summer at the public library's used sale, I had to create some new labels! My goal is to expand my nonfiction section and I think I'm slowing getting there! I used a zebra board and bright colors for all the tags. I made 8 tags total and also sent them through the laminator!


Here is my pile of "stuff" I'm still working on... laminating my classroom rules thanks to The Tattooed Teacher's TPT store. They are so bright! Check them out here. I'm hoping to find some zebra ribbon so I can string them all together. I also found a great vertical expanding file for organzing graded papers at Deals for only $2 dollars! I made a cute sign to go inside the front pouch. I also cut out tons of words (reading, writing, etc.) for around my room with my Cricut. I used the same neon cardstock I found at Target... but I forgot to take a picture. I also need to laminate the Text Structure posters I purchased from Pinkadot's Teachers Pay Teachers Store. You can find them here. I'm going to create a display with text structures above my nonfiction section of my library! Whew! I'm exhausted!


 What did you make with your must have this Monday?
(Say that ten times fast!)

Share:

Monday, July 22, 2013

Semi-Homemade Monday

So I spent the morning waiting outside United Art & Education for their annual teacher "surprise" giveaway! It was a little cloudy but I figured I'd tough it out with my camping chair and umbrella. After about 20  minutes it started to sprinkle so the manager let us in early - what great customer service! I only had a $5 dollar gift card this year but that was all I needed to purchase my new job bulletin board set! My job board is old and starting to fall apart so I've been wanting a new one... so I found this gem on sale for $5.59!


 If you're interested in this job chart you can find it here.

So naturally, since I bought a new job board while at Wal-mart I went down the office supply aisle and knew that I just had to have the personal laminator that EVERYONE keeps raving about. I was a little bit skeptical of the quality for $24.97 - I'll be honest. But oh my goodness....


It actually WORKS! The lamination is really thick. Much thicker than our school lamination! I was quite shocked at how well it all came out! I'm going to have to purchase a few more pouches! I wouldn't use it for everything (that could get pricey & school is free) but something that needs to be more durable... for sure! Two penny-pinching thumbs up! Worth the money!

I took the premade job signs and laminated those. I also had to create a few of my own jobs. I used some scrapbook stickers I already had that were bright colors to create some new jobs. Below are two jobs that I added to the blank signs... I have a homework collector that collects each day's homework and a two students carry our lunch bin down to the cafeteria and bring it back after recess.


After all the jobs were laminated, I took some Velcro to affix the student plates. There are little slits that you can slide jobs into but oh that would get tedious! Plus, I laminated mine shut!


Once I get into my classroom I'm going to create my board! It wasn't entirely created by me... but, I like to think it was a semi-Monday-Made-It project sort of like the Food Network show, Semi-Homemade! Don't forget to link up with Tara at 4th Grade Frolics to share your Monday Made Its!


Have a wonderful Monday!
Share:

Monday, July 8, 2013

Made a little Somethin'-Somethin'

So, it's Monday and I thought I'd share what I've been up too with two different linky parties! I'm joining up for the first time with the Eating, Drinking, and Linking party hosted by Teaching Tales Along the Yellow Brick Road. And I'm also joining up for another addition of Made it Monday hosted by Tara at Fourth Grade Frolics.


I have found tons of great recipes on Pinterest. However, so far, a lot of them have been a complete flop! My versions never turn out quite the same way... But, I did find a great strawberry pie recipe on Pinterest and decided to give it a go! I have a garden full of strawberries and wanted something easy to make with them... and here's the recipe I found for Black Bottom Strawberry Pie.


Here's my finished version.... I substituted graham cracker crust because I prefer it. It tasted fantastic but the regular pie crust probably would have held together a little better. Thumbs up from our household! 


Well, as many of you can see - I created an new layout for my blog! Designed by yours truly... I'm still working out the exact details but I think it looks pretty good! I really wanted a blog makeover and decided to try do it DYI style before I pay for a makeover. I don't think I did too bad for teaching myself! Let me know if any links or something doesn't work!


Next, I decided to do some up-cycling and transform these blah Tide Pod containers into something more festive and fun! I found some zebra print "doilies" for cupcakes at JoAnn's last week and figured they'd be perfect for my Tide Pod project. Here's how they looked before & after....


I still need to laminate them and I might go back and try and back the letters if I can peel them off but if not, I'm going with it! Not too shabby of a craft project. Now my Box Top and Pop Tab bins will match this year! 

What did you make this Monday?

Share:

Tuesday, June 25, 2013

Library Buckets & Magnetic Sign


So my Made It Monday is coming a little late. I had most of the supplies and ambition to start it  yesterday but it turns out, no hot glue. How can you craft anything without hot glue? I was not running out by the time I discovered my error, so for this time, it's Made It Tuesday! 


Here's the before....

 So, I've blogged about the new library system I want to try! My students did a terrible job this year at keeping my library organized. They checked out the books but then they would throw them back any old place even though most have labels on them. Many books are even grouped by AUTHOR... but my students didn't seem to notice or remember where they found their books... so, via Pinterest I found a great solution. Another teacher created "shelf marker" sticks to help students remember where they took the book from. They stay in the bins until the books are returned. Genius, right?

So for my first made it... I created little buckets to hold my sticks. One for each of my classes. The letters represent our last names so the kids know where to find their specific sticks and numbers.

The colors are teal and lime green. I found the felt letters on clearance at Michael's for .99cents each and the buckets were also at Michael's for only $1. So for a whopping $4 dollars (I already had the buttons and flowers) I created two buckets for library sticks.

Then to go into the buckets I found these bright adorable zebra print numbers to put on top of craft sticks. These aren't done yet because I want to laminate all my numbers before gluing them onto the craft sticks. My goal is that students will then place their numbers in the buckets as they check out books.


My  second made it of the week was something I've been wanting to do for a while but didn't have everything I needed. So after visiting the craft store for hot glue... I came home with all the supplies! Here's Made It #2.... A magnetic "Leaving the Room" sign-out.


I really want to put this sign by my door. I'm thinking of hanging it from Command hooks or velcroing it to the wall. I haven't made a "hanger" with ribbon yet because I'm not sure I have a physical place to "hang it" since I already have an eyewash by my door. I haven't glued down the letters yet because I'm debating if I want them straight or a little up and down. I used cork circles (they were only a $1.79) and magnets for the student numbers. I was going to use marbles but I was already racking up my total. The letters and ribbon are from Target's dollar bin. It is so lime green and teal since that's what I'm going with as a loose "color scheme."

Here's the buckets I already have in my library.... I think my new stuff matches quite well!

I can't wait to see what everyone else created...

Share:

Monday, June 17, 2013

Made it Monday: Pixar Edition

So, today's Made It Monday linky party hosted by 4th Grade Frolics has a Pixar theme. First, I wasted some time today creating my own Monsters Inc. Monster from Disney's Website. You can go here to create a monster of your very own! It'll even help you generate a name for your monster. Mine is Miss Shufflebottom!

Isn't it too cute? I love my awesome glasses and purple complexion!

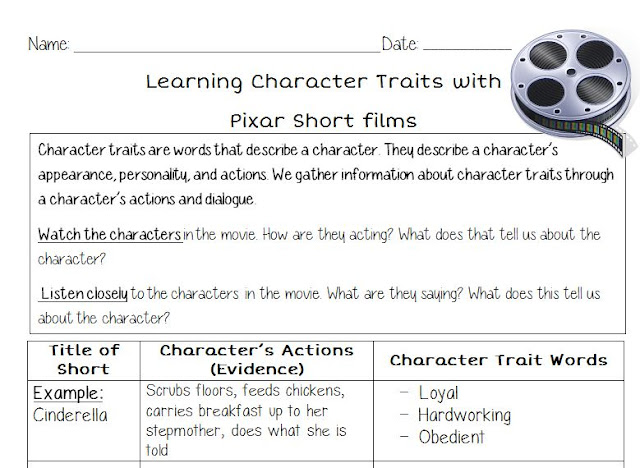
On a somewhat more serious note, I've been working on a bundle of worksheets that can be used with the Pixar Short Films (Volume 1 or Volume 2). Even though they're not quite finished, I wanted to share the start with everyone! There are lots of links on Pinterest of teachers using the videos to teach everything from inference, character traits, theme, summarizing, etc. I've been using the videos during summer school to model key reading strategies and it's been hard to find actual handouts to go with the lesson plans online...therefore, I'm slowly and surely creating my own versions.
I've started creating a handout for character traits since we've been working on that this week during summer school.  Here's what I have so far.... (I'm also trying to find some better clipart but that's part of the "in progress.").

I'm hopefully going to be adding a sheet for predicting/inferencing, summarizing, learning about characters through dialogue, and theme to go with the bundle. A teacher I work with put together a theme handout and the students LOVED watching the videos to model the concept of theme. If you get a chance, grab copies, they are wonderful additions to your classroom library. If you click the pictures you can go check them out on Amazon.com!
  
Any other reading strategies I'm forgetting to include? 


This year my 5th's graders voted that "For the Birds" was by far their favorite "short." They also enjoyed the shorts of "Lifed" and "Presto." I'm hoping to incorporate more Pixar Shorts into summer school this week. I think we are going to do a "shorts" writing project in which they need to a short summary about the video using "Somebody...Wanted...But...So...Then" and then decorate a pair of summer time "shorts" for the main character. 

Hope everyone had a great weekend! Can't wait to see everyone's Made Its!

Share:
Design by Laugh Eat Learn // Theme by Pipdig